in this example,I:
- after the device start BLE advertising, press Button_1 can change LED_1 PWM frequency
Usually, PWM function initialize once on system start, and that means we can only able/disable it or change its percentage. However, if you want to change PWM frequency, you must initialize PWM function again. In this article, there is one way to re-initialize PWM function which the device does not need to restart.
This example is modified from ble_app_template
located in:
nRF5_SDK_14.2.0_17b948a\nRF5_SDK_14.2.0_17b948a\examples\ble_peripheral\ble_app_template
Board:nRF52840/SDK14/S140
STEP 0. project config
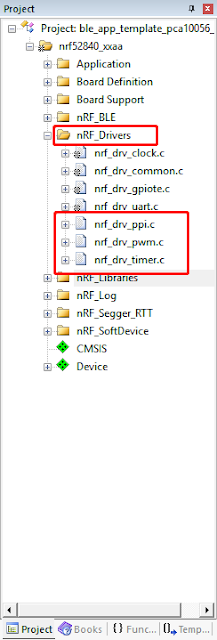
add "nrf_drv_ppi", "nrf_drv_pwm","nrf_drv_timer" in nRF_Drivers
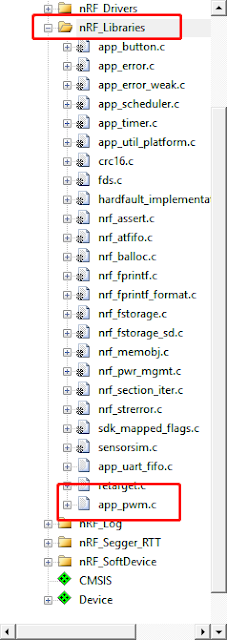
add "app_pwm.c" in nRF_Library
STEP 1. modify "sdk_config"
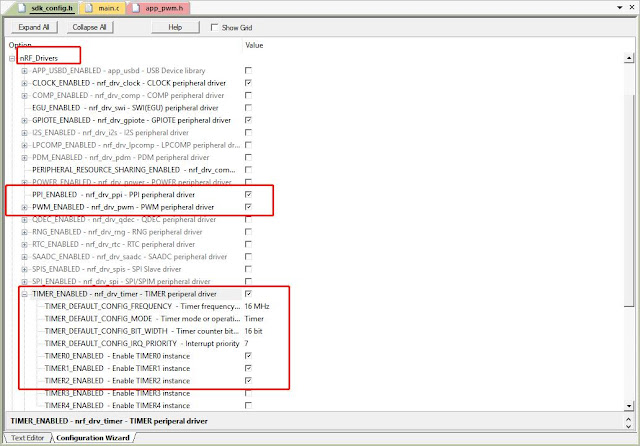
in "nrf_drivers"
check PWM_ENABLED
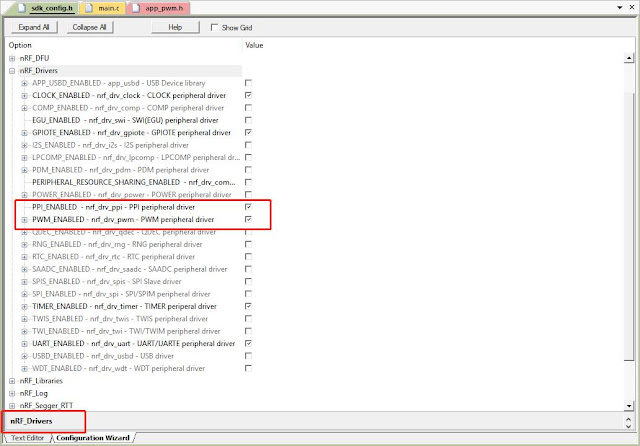
PPI_ENABLED
at least enabled 3 timers
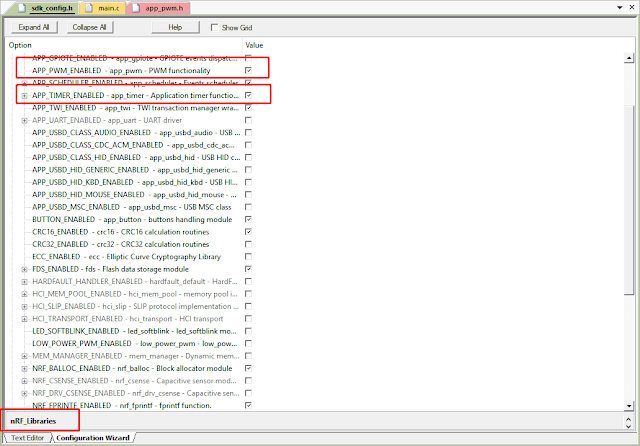
in nrf_library
check APP_PWM_ENABLED, APP_TIMER_ENABLED
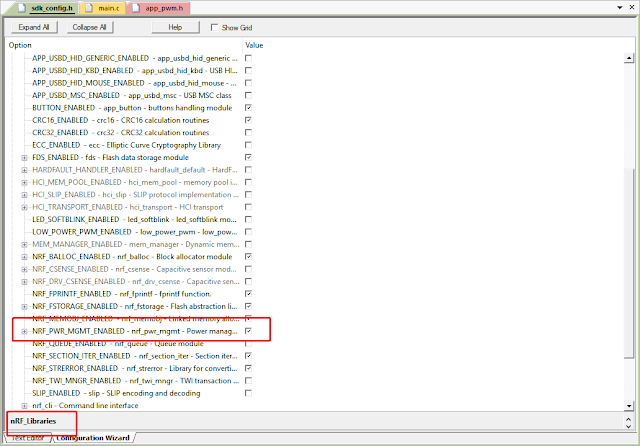
check NRF_PWR_MGNT_ENABLED
STEP 3. modify main.c
add these include & #define in main.c
#include "app_pwm.h"
#include "nrf_delay.h"

#include "nrf_pwr_mgmt.h"
#include "nrf_drv_power.h"
#include "nrf_drv_ppi.h"
#include "nrf_drv_timer.h"

APP_PWM_INSTANCE(PWM1,2);                   // Create the instance "PWM1" using TIMER2.
static volatile bool ready_flag;            // A flag indicating PWM status.
static bool is_low_frequency = false;

APP_TIMER_DEF(m_pwm_timer_id);
#define PWM_INTERVAL      APP_TIMER_TICKS(1*1000)
add the following code in main function after services_init( )
    /*1000 period us = 1kHz*/
    app_pwm_config_t pwm1_cfg = APP_PWM_DEFAULT_CONFIG_1CH(1000L, BSP_LED_1);
    /* Switch the polarity of the second channel. */
    pwm1_cfg.pin_polarity[1] = APP_PWM_POLARITY_ACTIVE_LOW;
    /* Initialize and enable PWM. */
    err_code = app_pwm_init(&PWM1,&pwm1_cfg,pwm_ready_callback);
    APP_ERROR_CHECK(err_code);
    app_pwm_enable(&PWM1);
add the following code before bsp_event_handler(bsp_event_t event)
void pwm_ready_callback(uint32_t pwm_id)    // PWM callback function
{
    ready_flag = true;
}


static void pwm_init_low_frequency(void)
{
 ret_code_t err_code;

 app_pwm_disable(&PWM1);
 app_pwm_uninit(&PWM1);
 /*4Hz = 2500000 us period*/ app_pwm_config_t pwm1_cfg = APP_PWM_DEFAULT_CONFIG_1CH(2500000, BSP_LED_1);
 /* Switch the polarity of the second channel. */
 pwm1_cfg.pin_polarity[1] = APP_PWM_POLARITY_ACTIVE_LOW;
 /* Initialize and enable PWM. */
 err_code = app_pwm_init(&PWM1,&pwm1_cfg,pwm_ready_callback);
 APP_ERROR_CHECK(err_code);
 app_pwm_enable(&PWM1);
}


static void pwm_init_high_frequency(void)
{
 ret_code_t err_code;

 app_pwm_disable(&PWM1);
 app_pwm_uninit(&PWM1);
 /*10Hz = 100000 us period*/
 app_pwm_config_t pwm1_cfg = APP_PWM_DEFAULT_CONFIG_1CH(1000, BSP_LED_1);
 /* Switch the polarity of the second channel. */
 pwm1_cfg.pin_polarity[1] = APP_PWM_POLARITY_ACTIVE_LOW;
 /* Initialize and enable PWM. */
 err_code = app_pwm_init(&PWM1,&pwm1_cfg,pwm_ready_callback);
 APP_ERROR_CHECK(err_code);
 app_pwm_enable(&PWM1);
}
add the following code in bsp_event_handler(bsp_event_t event) function
static void bsp_event_handler(bsp_event_t event)
{
    ret_code_t err_code;

    switch (event)
    {
        case BSP_EVENT_SLEEP:
            sleep_mode_enter();
            break; // BSP_EVENT_SLEEP

        case BSP_EVENT_DISCONNECT:
            err_code = sd_ble_gap_disconnect(m_conn_handle,
                                             BLE_HCI_REMOTE_USER_TERMINATED_CONNECTION);
            if (err_code != NRF_ERROR_INVALID_STATE)
            {
                APP_ERROR_CHECK(err_code);
            }
            break; // BSP_EVENT_DISCONNECT

        case BSP_EVENT_WHITELIST_OFF:
            if (m_conn_handle == BLE_CONN_HANDLE_INVALID)
            {
                err_code = ble_advertising_restart_without_whitelist(&m_advertising);
                if (err_code != NRF_ERROR_INVALID_STATE)
                {
                    APP_ERROR_CHECK(err_code);
                }
            }
            break; // BSP_EVENT_KEY_0

  case BSP_EVENT_KEY_1:

   if(false == is_low_frequency)
   {
    pwm_init_low_frequency();
    NRF_LOG_INFO("agatha: low frequency mode\r\n");

    is_low_frequency = true;
   }
   else
   {
    pwm_init_high_frequency();
    NRF_LOG_INFO("agatha: high frequency mode\r\n");

    is_low_frequency = false;
   }

   break;

        default:
            break;
    }
}
add this function before timers_init( )
static uint8_t pwm_percentage=25;
static void pwm_timeout_handler (void * p_context)
{
 uint32_t value;

 ready_flag = false;
 /* Set the duty cycle - keep trying until PWM is ready... */
 while (app_pwm_channel_duty_set(&PWM1, 0, pwm_percentage) == NRF_ERROR_BUSY);

}
add this function in timers_init( )
static void timers_init(void)
{
    // Initialize timer module.
    ret_code_t err_code = app_timer_init();
    APP_ERROR_CHECK(err_code);

 err_code = app_timer_create(&m_pwm_timer_id,
    APP_TIMER_MODE_REPEATED,
    pwm_timeout_handler);
}
add this function in application_timers_start(void)
static void application_timers_start(void)
{
    /* YOUR_JOB: Start your timers. below is an example of how to start a timer.
       ret_code_t err_code;
       err_code = app_timer_start(m_app_timer_id, TIMER_INTERVAL, NULL);
       APP_ERROR_CHECK(err_code); */
 ret_code_t err_code;

 err_code = app_timer_start(m_pwm_timer_id, PWM_INTERVAL, NULL);
 APP_ERROR_CHECK(err_code);

}
program and reset your device, then open your COM port, when you once press button_1,
you will see:
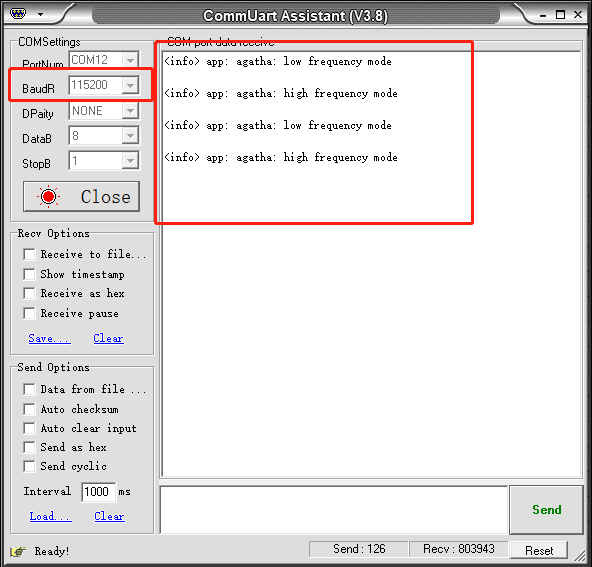
and on your device , you can see in 25% PWM switch from 1000Hz to 4Hz without restart.
REFERENCE:
uninitialize and reinitialize the PWM
https://devzone.nordicsemi.com/f/nordic-q-a/10672/changing-pwm-frequency-period
沒有留言:
張貼留言